

Complete Guide to Git and GitHub as a Complete Beginner
The Complete Guide to git you'll ever need

Imagine that you have a program that you wanna share with other people or just even want to collaborate with others. In that case, you've got Two options:
Either compress all the necessary files in one archive and then either E-mail them to the other collaborators or store them in any USB thumb drive and then share the drive with the collaborators.
Code Everything in Google Docs and then just give access to the other collaborators, while compromising the benefits of Auto Code Suggestion and many more that a COde editor can offer.
So basically the idea is that you wanna share your code and still don't wanna mess up the codebase and even track the changes that you or your friends are making without any hassle.
But let's take any other example like you have a team of 50 people, exchanging the code among each other becomes quite stressful as Emailing each of them when one changes even a single line becomes a burden.
So back in time all of these problems were considered by a Developer named Linus Torwarlds, yea the same Person who developed the Linux World and developed software named GIT.
We'll be using GitHub to host all the code, but you're free to use any of them as all perform the same task unless and until you've taken the paid subscription.
What is Git??
Git is a software that can track your files and codebase and even share the codebase with an online service provider such as GitHub, GitLab, and others, from which other people can watch, contribute and understand the purpose of the code you've written ( if following the proper standard of coding ).
Aren't Git, GitHub and others are same??
Well technically not, As Git seems to be working with GitHub, GitLab, and other Online service providers but still GitHub and other service providers are just a product of Git ( a Software ). In Short, GitHub and other online Service Providers are just built on top of the functionality of Git, and can also be called Products of Git.
See it as a Front-end of Git or Git without commands, as using this we're using Git only but without any command and also in a way more efficient manner.
Downloading and Installing Git on Your System
To download Git on your System, head over to Git's Official Website and Download it for free for any of the Operating System architectures.
All of Git and its products are free but the only thing that makes a difference between Git and its products is that its products come with a paid plan too, which on the other side Git is completely free.
After Downloading Git you might have to configure your keys
Execute this commands
git config --global user.name "<Your Username>"
git config --global user.email "<Your Email linked with GitHub ( if any )>"
Now let's move on to use Git on your machine if it's successfully Installed.
How Git works??
Git performs all the operations in 3 different parts/steps.

Working Directory:- Move everything to the staging area In this step, Git moves all the files to the staging area. This also means that all the changes are being saved or Git is taking a snapshot of all the modified/added/deleted files.
Staging Area: A staging area is a place/phase where all the files are saved as a Snapshot and all the files need to be committed to being moved forward in the .git directory.
final Stage:- Commit and save In this stage, we the developers write meaningful commits about what changes we've introduced in certain files and what we've Updated. keep in mind that the commits are to be small and precise.
Git Basics
Let's start with the complete basics. Let's Create a Directory ( a blank directory ) and add some files with some contents in it.
Now let's tell git to watch this directory, to do so we've to write a command in the terminal. Fire up your terminal coz we're going to do it in the dirty techy way.
- To make the directory a Git repo you must run
git init
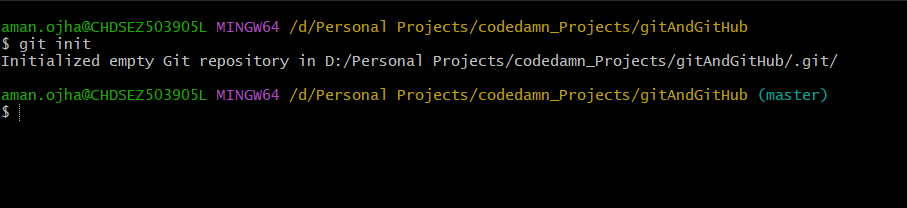
this makes the normal directory of your system into a Git Repo.
- To Add files to the repo, make sure to execute this command
git add <filename>.<extension>

this makes your git software specifically watch a file for any changes and track it on your behalf.
Or even you can add all the untracked or modified files just by writing this one-line command
git add .

This will add all the files in the staging area, the files ignored will be only the files that are mentioned in .gitignore. That's a point for a separate article, which will be released after this article gets released.
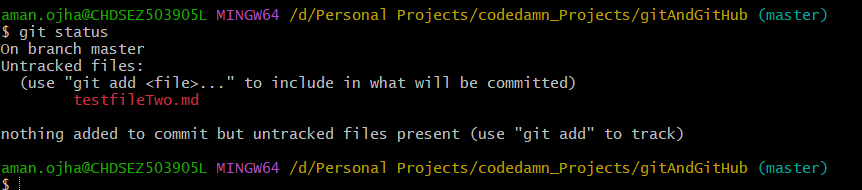
Git Status
Now as we've added the files and added them to the Git Working area, we can see what files have been changed or even change the files if added by mistake.
To get the status of the project we can simply run the command
git status
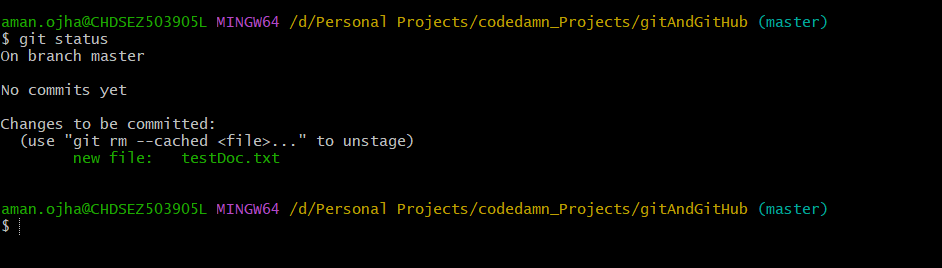
The status of the project is like a complete overview of the Project of what you've changed added or deleted.
Git Commit
As we now know all the files added have to be committed to being moved to the .git directory else it'll remain in the staging area.
The general syntax for committing files is
git commit
It will open the default editor to write your commit messages, but we always bypass this process and enter the commit messages right into the terminal only, by using
git status -m "Test Commit"
here in this -m indicates that here is the message for the commit.

Now we've successfully committed an empty file, let's check out the status of our First Git Repository.
git status

Now we can see that the status of the Project has been changed and we're on Branch master with a clean working tree.
The Working Tree is the code which we work with, if we change anything here in the project, the working tree becomes disturbed according to git.
Intermediate Git and its usage
Till now we have about how to commit our changes to the git system, but now let's take a bit more deep dive into Git.
History of the Changes made to the Codebase
Let's say you want to see what changes we made in the past, Git provides us with a very useful command to let us peek into the time and see what changes we've made in the past with the help of commits.
git log
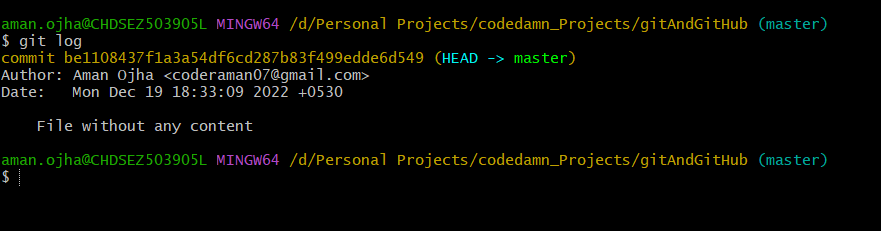
Here are all the commits made in this project, as we've made a single commit in this we can see there is only one single commit available. Not only we can see the commit message we can also see the Author ( who made this commit ) with its time and timezone.
This command helps us to see all the commits made in the project and all the history of the code. We can also go back in the code and see what was the project structure like at that particular time.
Let's move back in time
So what if we can change what are the commit messages of some particular time which is in the past? We still have to find each of the files and make changes if we want to.
But wait we can go back in time, which means that we can see what the codebase looks like at a particular time ( when the commit was being made ). Let's see how we can do the same.
With commit messages we are also getting the SHA keys, SHA keys are simple text with obfuscated Text and Numbers. It is similar to commit be1108437f1a3a54df6cd287b83f499edde6d549.
Now first let's add more files and logs to make our commit tree a bit larger than the present. So I added a few files with some content in them.

Let's say we want to delete the last commit from the log tree, to accomplish that we must use git reset <SHA key> to move back to that code of that time.
Trying this will undo all the actions performed after that particular commit you select and all the codes and files will move back to the staging area.
git reset 0331ffa126f91401c826defc00c9554eccd55523
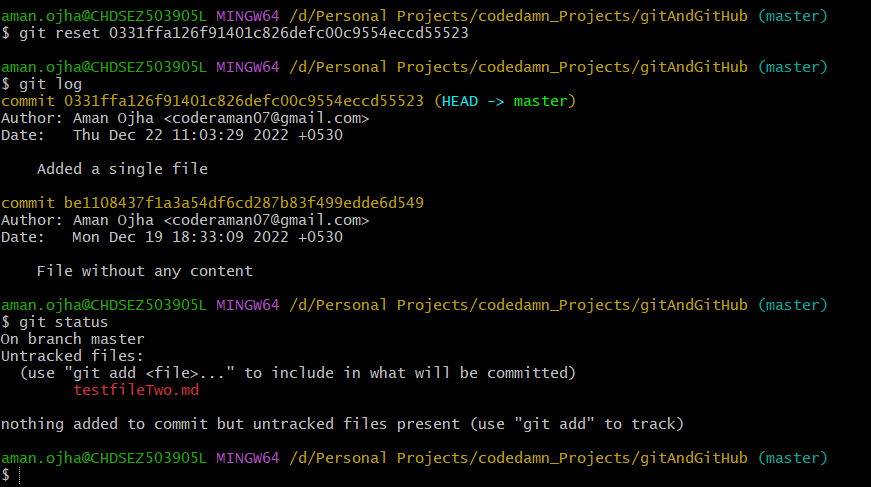
As we can see in the status of the project all the files committed after the commit we chose will move back to the Unstaged area and it'll be untracked again. This will help a developer to reverse back the codebase to the version when it was running fine.
Save the Code without affecting the Codebase
Let's say you want to write the complete upgrade or in other words, you want to develop your project from scratch again but don't want to mess up the current codebase. We can achieve that by performing either of the two ways:-
Commit the changed code to another branch of the project/repo. ( we've discussed about branches later on in the article )
Stash It
Stashing the Code
Let's say you want to make the required changes to the project but still don't want it to appear on the log tree unless it's required.
Let's take a look at our current project Structure.
The basic syntax for the Stash command is
git stash <name>
Now head over to try this command to save the code without committing it to the log tree
git add .

git stash save
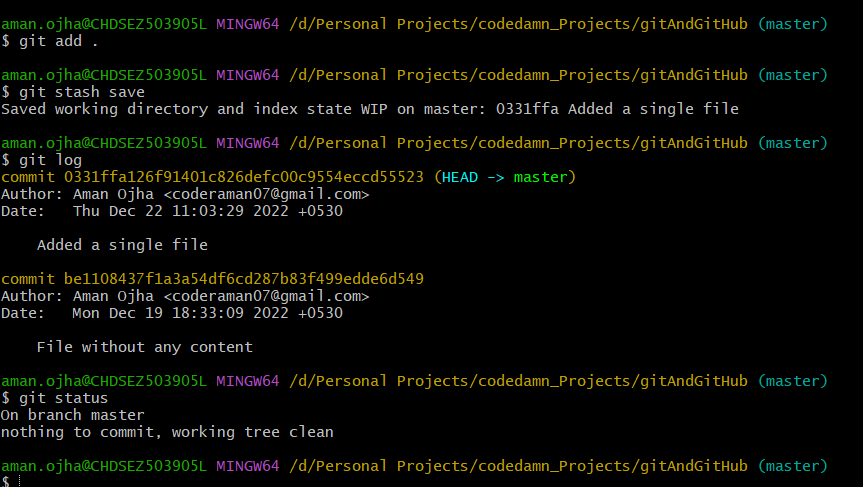
As we can see in the above command all the uncommitted code is moved back from the unstaged area and still it doesn't appear in the log-tree.
Try this command in your Project and then try running git status.
Bringing back the Stashed Code
The stash command does that it moves the uncommitted code to a specific hidden location inside the .git directory and can only be brought back with a specific command.
Try running the command
git stash pop

git status
This will bring all the uncommitted code stored as stashed code to the Staged area.
Deleting the Stashed Code
Let's Imagine you were working on some code that you were stashing before but now you ( and or your team ) realize that you don't want that code anymore.
To delete those stashed codes you have to try executing this command
git stash clear
Executing this command will clear all the stashed code of the repo/project.
GitHub
So after performing and learning all these concepts, let's move a step further and talk about GitHub. ( You're free to choose any other too but I'll use GitHub to perform all the steps from now on due to its popularity, I've got a Pro subscription So I use this only, All of the articles I've written are available here only which forces me to access all the contents at one Place )
To create a new account if you want and move to github.com/new to create a new Repository or create a new repository on your preferred Online Git Service Provider.
Connection of the repo and our Local Project
Till now you must have a project with at least a single commit and a project on GitHub, GitLab, bitBucket or any of the others.
I've created a Project named test on GitHub to continue with this Article, you can access all the commands over here and the repository will be deleted.
You can make the connection between the GitHub repository and the local repository by executing this command
git remote add origin https://github.com/coderaman7/codedamn-git-repo.git
OR something like
git remote add origin https://github.com/<github-username>/<repo-name>.git
with the above command, we saw that we linked our Local repository with the Online repository available at GitHub.
Upload all the Code
Until now we made commits, wrote some logic, made commits again, and linked our repository with the Online repository. But the code is still not uploaded on Github, it still needs to be authorized to be able to upload on GitHub.
To Upload the code on GitHub we have to execute
git push -u origin master
this command can Upload all the code to GitHub with the branch master, while master is also set to as default for any upload made in the future, which means next time when we need to upload we can just execute git push to upload all the code on Github on the master branch.
Next time while uploading all the code, all we need to do is
git push
if and only if we had a branch set as default which here we set as master.
I know there's a question
What are Branches??
Branches
A branch is a feature provided to us by Git not GitHub, which enables us to save some code from directly affecting the Codebase, enables us to store the code under a different version of the software resulting in not affecting the current stable version of the repository.
Branches also provide us with a feature by which we can expand the current version of the repo not affecting the current version of the repo.
So what's the difference between stashing and branches
Stashing is a process in which a user/Developer can save the work and still he doesn't have to commit his code and is only available at the local repo.
while the Branches feature of Git allows the developer to make a commit and upload all the code on the online repo and still doesn't affect the current version of the codebase.
It's just like a Book, When you purchase the book, the complete book gets purchased but along with the front page and index of the book other parts of the book ( chapters, acknowledgment, references, and other) comes along.
Just like in our codebase we download the complete repository with the main branch and the others too but the main acting branch will only be the master branch.
Use of Branches
We use branches to separate the codebase when we need to develop, fix a bug, or enhance the project by adding or modifying the codebase without affecting the current version of the code. It's a general practice to modify the codebase under a separate branch so that the current version shall not be affected, and in the end, we merge all the code with the main branch to affect the code with the production quality codebase.
Create a Branch
To create a new branch in a repo we use
git branch feature
Delete a Branch
We use git branch -d <branch-name> to delete a branch from the repo.
This article was originally written back when I was starting but as a private article, I was afraid of building in Public but now Let's do this.
So my Web App which I am rebuilding is available on justaman045.vercel.app you can visit it now also but it's currently under heavy maintenance and the look and feel will change in about 2 or 3 weeks.
Promotion
Currently, I am also focused on building the Community mentioned below:
Anime Community:- Instagram/otakuanime69
Motivational Theme Page:- Instagram/glorymotivation7
also, I'm currently focused on building my Brand named Otaku Outfits currently it's in the approval stage on Etsy but once it is live I'll be sharing it with you all by making sure to subscribe to my Newsletter from the Newsletter tab.
Also, it'll be helpful if you can just follow this link to Medium and give me a like and follow there too.
Contact
To contact you can join my Discord Server where I intend to keep the community in one place and also serve the community
Discord Link:- https://discord.gg/ZfAKPZvT ( It's brand new and I'm okay if you help me out on setting up this ).
Thanks for Reading
Happy Hacking


